So I finally plucked up the courage to have the thread lift treatment to improve the drooping of my face which is more obvious when I look down.
In this blog, I will be sharing what happened for me in the treatment process.
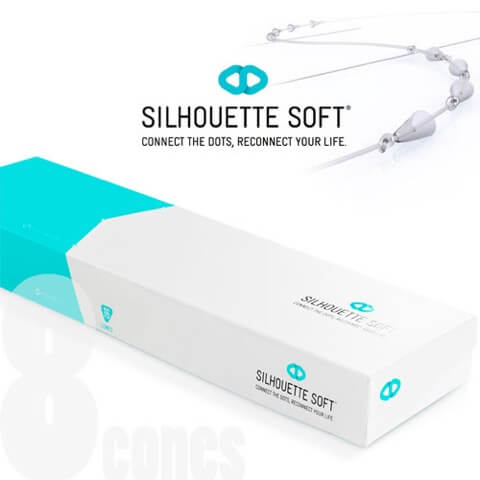
But before that, that are 2 main types of thread lifts – Silhouette Soft and PDO threads. I decided on the Silhouette Soft because it has been researched to actually result in the production of Type 1 Collagen fibres which is the flexible healthy young collagen compared to the Type 3 Collagen fibres which is the tough scar type tissue (which occurs more with PDO threads). Silhouette Soft also produces less bruising and swelling.
So who better to ask to do my treatment in the first place as I can’t do it myself as I do for my patients than the man who actually invented Silhouette Soft – plastic surgeon Dr Roberto Pizzamiglio. He’s also my mentor who trained me on how to perform this treatment well. I’m very fortunate to call him my colleague at the W1 Knightsbridge clinic where I practice in London.
BEFORE THE TREATMENT
- First, pictures were taken and my face was marked where the most lift was going to be achieved with the minimal number of threads.
-
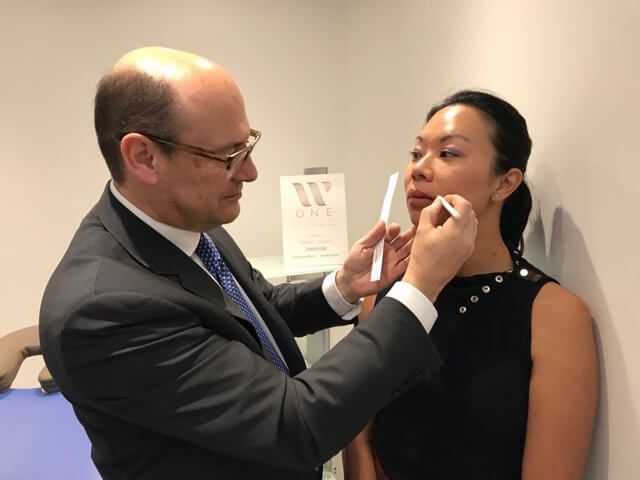
Next, I laid down on the treatment bed and my skin was cleaned. Local anaesthetic with adrenaline was then injected in specific points on my face where the threads would enter and exit. Adrenaline is used to reduce the bleeding as it contracts the blood vessels. In my case, it would enter in 2 points in my hairline and exit in 2 points by the corner of my mouth in a U-shape formation as I wanted to improve my “pouchies” (explained below). A few more anaesthetic injection was applied along the line where the thread was to be placed to reduce the pain when the thread is passed through.
I am not going to lie. The injections did hurt. I needed to squeeze a couple of stress balls to get through it. I have to admit I’m a total woose when it comes to injections that is why I’m very empathetic with my own patients and do my best to minimise pain and discomfort because I don’t deal well with it myself. However as you will read later, the anaesthetic was so effective that I didn’t feel any pain during the treatment itself.
NOTE: If you’ve read my other blog “Was my thread lift treatment worth it?”, you will know what “pouchies” are. But in essence, It’s basically the loose skin that gathers at the side of the mouth especially when you lean forward. It’s a sign that the mid-face is drooping, losing it’s structural support (or biological Velcro) and gravity is pulling it down. If left untreated, the mid-face will continue to drop and the folds will be more obvious. This will lead to more lines and folds from the nose all the way to the chin (nasolabial and marionette lines).
- Next, while waiting for the local anaesthetic to take effect, my skin was cleaned again and a clinical drape was placed around my face to maintain an aseptic field.
- The Silhouette Soft thread comes in 2 needles on either side with the thread in the middle. It comes with 8 cones, 12 cones or 16 cones. The cones anchor in the tissues so a lift can be created when the thread is pulled. The cones also stimulate new collagen formation. The threads take about 8 – 12 months to dissolve by which is replaced with new collagen in the vector where it is placed, creating a long term result. From the initial assessment, it was decided I was to have the 16-cone threads, one on each side in a U-formation.
DURING THE TREATMENT
- Once the local anaesthetic takes effect (about 3-5 minutes), it was time for the actual treatment. Below, I explain what actually happens as I know as a fellow treating doctor but during the treatment, you won’t really know where the needle and thread is at.
-
One needle was inserted by my hairline and passed through my facial tissues, making sure it is in the right level so it creates a smooth finish. It then exited by my nasolabial lines (laugh lines), above my mouth. The thread was then gently pulled through, creating traction to the skin along the way and the thread was cut close to the needle.
I DID NOT FEEL A THING!!! Okay, I can feel the pull and push, but NO PAIN AT ALL.
- The 2nd needle of the same thread was then inserted by my hairline below the initial entry point and same process was repeated with the exit point just below the corner of my mouth, creating a U-shape formation.
- When the threads were cut, the threads still stick out of my skin because we needed to finish the treatment on the other side, sit myself up and then my surgeon can do the final pull and tweaks before the thread is cut flushed to the skin.
- The threads was then inserted in the same way on the other side.
- Once all the needles have been removed, I sit to assess and my surgeon pull the thread left behind through the exit point, creating skin traction on the other side to achieve the lift that I would be happy with.
- After we both agree on the lift, he then cut the threads flush on my skin and the treatment is completed.
AFTER THE TREATMENT
- He finishes off cleaning my skin again and applying antibiotic cream on the entry and exit points.
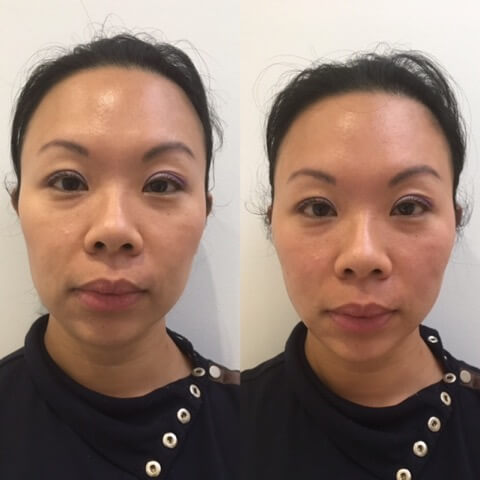
- I looked in the mirror and was happy with the result.
There are important after-care instructions with thread lift treatment and every patient receives them. I will write another blog on my recovery and will share the important points there.
But in short, I actually went back to work that afternoon seeing patients and even had a photoshoot/ filming the following done.
Hope you find this blog useful. If you have any questions about the procedure itself, please let me know in the comments below.
To your best self.
![]()